Pages

Showing posts with label MCO's Guest Bloggers. Show all posts

Saturday, May 4, 2013

DIY Tulip Wreath {Perfect for Mothers Day}

To say I love wreaths is probably an understatement. They are super expensive so I had to start making my own so I want to share my new Spring wreath.

Tulip Love


What you need:

Twig wreath 12' or 24' whichever you prefer this one is 24'
30 tulips give or take a few
burlap ribbon 3'
metal floral wire
hot glue gun


To start you need to take your burlap ribbon and fold it over four times for the underside ribbon take wire and twist in the middle. Do this again but 3/4 the lenght of the first riboon bundle wrap with wire. Fluff and attach to wreath.


I started going up first. I cut each tulip to the desired lenght and hot glued each tulip seperatley to secure them tightly.  Continue to add one tulip at at time until you get around the top of the wreath. Please excuse my nasty craft towel I hate to get hot glue everywhere!


Next go down continue to cut and hot glue each tulip around the bottom alternating colors and leaves.  I attached the leaves seperatley from the flowers to cover any spot that are less than lovely.


Once you have all the tulips on take the ribbon and hot glue it under the bow and go around covering any icky spots with ribbon until you get the desired coverage and look.


Make a hanger from the wire floral ribbon to hang your wreath do not hang the wreath on the twigs they will snap.


Hope you love your wreath as much as I love mine.
Make your day a Faith Filled Footstep kinds day!


Love this blog? 
Vote for us daily so we can continue to bring you great giveaways!

Visit Top Mommy Blogs To Vote For Me!


Advertisement

You've made the switch to cloth for your little one,
 now why not make the switch for yourself?

Wednesday, May 1, 2013

Kindergarten.


Hey guys, MCO here. Below is a post from our guest blogger Rebecca that I felt was very important to share. On my blog, I share a lot about baby gear and being the parent to a very busy toddler, but as you may know, Baby A is my only child and I have not experienced life raising a bigger kid. I have yet to experience my baby loosing his first tooth, coloring his first real picture, or the heart wrenching feeling of watching your little enter a classroom for the first time. Below is a story from Rebecca about sending her son off to Kindergarten, and although I'm not at that stage in my journey through parenthood, this story still wrenched at my heartstrings as I thought about Baby A growing up. I hope you enjoy it as much as I did.


As I write this, my son M., is about 8 weeks shy of completing Kindergarten. I cannot believe how fast time has gone. I also can tell you that every day that he gets on that school bus it feels like the first day all over again. There is something about putting your child in the care of someone else that makes my Mommy instincts kick in gear. Every time the bus pulls away I want to run after it, jump on and grab M. and take him home with me. Crazy, right? You would think I would be used to this by now. But, I am not.


As a parent you just want to keep your child safe from everything! Safe from being hurt, being picked on or teased. You can only hope that your child is being appropriate and kind to others. I try and instill this in my boys every day. But in this world, you also want them to be wary and watch for danger. It is super tough these days to be a kid. (and a parent!) You do not want your child growing up afraid but you need to teach them how to be safe as well.

M. and I have both done a lot of growing since last September.  School has molded him into a better behaved child who understands about following rules and being polite and respectful.  Him being in school has allowed me to let go of him a little more.  That is so hard to do.  Especially because he is only 5 years old.  In terms of a lifetime, that is SO young. He does quite well without me for those 8 hours that he is gone during the day.   He really loves school.  He loves learning and reading.  He loves interacting with children his age.  He is making friends and he loves his teachers.  Knowing that makes letting him get on that bus every day a bit easier.  Also knowing that he is so happy to see me at the bus stop every day.  He will tell me that he missed me during the day.  I do want him to enjoy school and all it has to offer.  He has such a great future in front of him.  All I can do is let him go so he can grab opportunities.  But, I know that he is always my little boy.  He still wants me to tuck him in every night.  And I still check on him before I go to bed.  I probably will until he moves out.  That is just how it is.


First Day of Kindergarten


Love this blog? 
Vote for us daily so we can continue to bring you great giveaways!

Visit Top Mommy Blogs To Vote For Me!


Advertisement

You've made the switch to cloth for your little one,
 now why not make the switch for yourself?

Monday, April 29, 2013

5 Non-Toy Gift Ideas for Kids

When birthdays or holidays roll around, it's usually a safe bet that your kids are going to get a lot of toys. So if you're looking to give them gifts that won't get lost in the pile of toys they're sure to get from relatives and friends, here's a list of non-toy gifts that have 14-month old L's seal of approval (and that will work for kids who are younger and much older, too.) An added perk of these gifts is that they take up little or no space in your house.

Note: I'm including links for some of these. They're not necessarily products I endorse or have reviewed; they're just added to give suggestions for where you can find some of the gifts.

1. Bird Feeder
A friend in our neighborhood has a bird feeder outside of her playroom window, and the kids love watching the birds and squirrels that stop by, so I decided to get one for L with some money he got for his birthday. Ours hasn't attracted any squirrels yet, but we regularly see cardinals, blue jays, sparrows, mourning doves, a bunch of birds I can't name, and two ducks! L loves watching the birds (he thinks the ducks are especially hilarious.) Our play area windows extend down almost to the floor, so it's easy for L to look out and see the feeder. If your windows are higher, there are bird feeders that stick directly to the window with suction cups so that kids can see the birds even from below the window. (I found a suction cup window bird feeder for $3 at Big Lots last week.) For older kids, you can combine this with a bird book written especially for children (Amazon has a bunch of them here) so that they can identify the birds they see, or you can buy a bird feeder kit so that they can build and decorate it themselves (with adult help, of course.)

Bird feeder tip - Our feeder was up for a week without a single bird visiting it, so a friend suggested that I cover toilet paper rolls in peanut butter, roll them in bird seed, and then hang them in the tree near the feeder. Within 24 hours, our bird feeder was the new neighborhood hot spot for birds.


2. Play Rug
A play rug brightens up a play room or bedroom and will give kids more options for playing with the toys they already have. I've seen play rugs at Walmart, Lowe's, Home Depot and Big Lots. You can find typical city or road style rugs, dollhouse rugs, maps of the United States, and even hopscotch rugs. You can get them as small as 1.5'x2' or large enough to cover a whole room. We found the 8'x10' Pottery Barn Kids rug that we use in our kitchen play area at our local Once Upon a Child store for only $48.

For now, it's mostly just nice that his play area is padded for when he falls (which happens quite a lot.) But when he gets older, he can drive toy cars on the roads and train tracks.


3. Family Photo Album
We don't have any family nearby, so I had been meaning to put some family pictures in an album for L so that he'd recognize his relatives when they come to visit, but I never quite got around to it. And then my mom made him this awesome book!
When I put the book on the floor to take a picture, he immediately ran  over to grab it.
You can see his shadow and his foot in the bottom picture.
Each page has a picture of one or more of his family members, and she wrote a cute rhyming story to go with the pictures. Included are pictures of L's grandparents, great-grandparents, aunts, uncles, cousins and parents (that's Dan and me... obviously.) She printed each picture onto thick computer paper, put each page into a plastic page protector, and put them all in a three-ringed binder. L loves the book so much that I recently confessed to my mom that I've had to hide it a few times when L was demanding that I read it dozens of times per day. You could make this as simple as a cheap photo album filled with pictures, or you could write a cute story like my mom did.

4. Zoo Membership
We just bought a zoo membership for the first time this year, but we have friends whose kids get a zoo membership as a gift every year. It's educational and fun, and it gives you something to do when you all need to get out of the house for a while. If you want your child to have an actual gift to open, you can combine it with a book (purchased or homemade) of pictures of animals you'll see when you visit the zoo.

5. Books
This is a favorite in our house. L loves when I read to him, and I try to make it a point of buying him at least one book for every major holiday. Even kids who don't typically like books will often enjoy them if you buy high quality books with a subject that interests them. Some kids' books are poorly written or illustrated, and even my 14-month old will reject books that aren't good. If you need ideas for good children's books, check out Sandra Boynton, Barefoot Books, or Usborne Books. For toddlers and babies, books should have only a few words per page (one to two sentences is a good length) and simple pictures or they'll quickly lose interest. We have a great used bookstore (Ukazoo Books) in our town, and I've found board books that looked brand new for $1-2.

For seven more great gifts that aren't toys, click here to visit my post, "12 Non-Toy Gift Ideas for Kids."


    Bethany is a contributing guest blogger for Mommys Craft Obsession. To read more, visit her blog, "I was promised more naps."


Love this blog? 
Vote for us daily so we can continue to bring you great giveaways!

Visit Top Mommy Blogs To Vote For Me!


Advertisement

You've made the switch to cloth for your little one,
 now why not make the switch for yourself?
Saturday, April 27, 2013

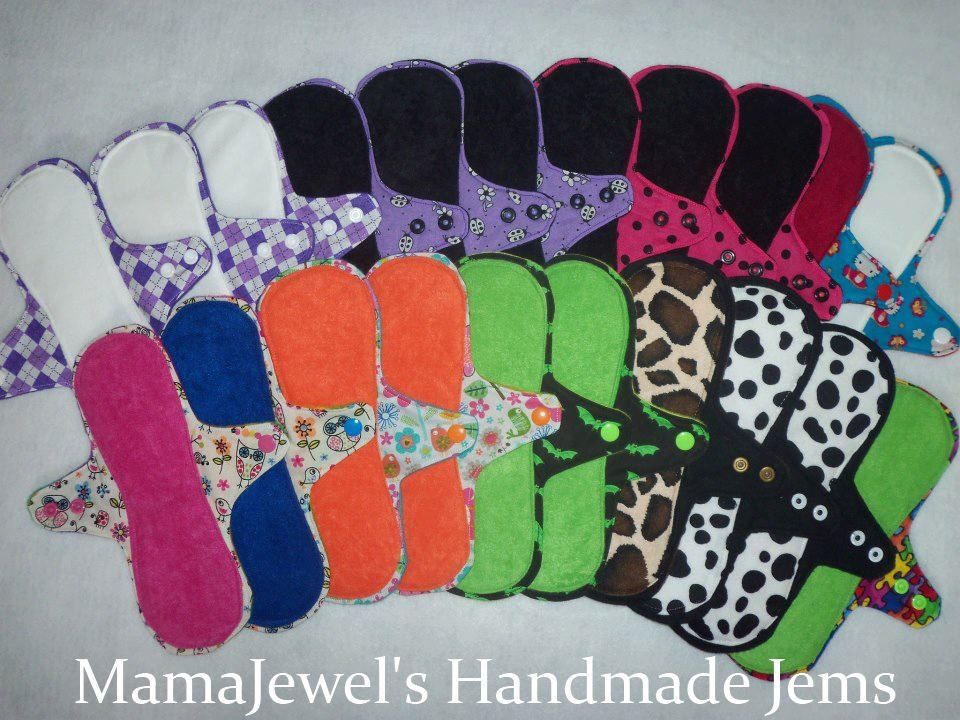
The Reasons Why I Cloth Diaper by Rebecca

I have two children. I never cloth diapered my oldest, M. I never even thought about doing it. With F., I found there was information on cloth diapering on every email or website about pregnancy that I happened upon. So, I looked in to it to see what all the hype was about. Wow! It's a whole other world! It is a beautiful world of colors and patterns and cute fluffy baby bums. I was sold!
I now use cloth diapers 85% of the time. If we are going to the store or to family's house, I use disposables. I also use disposables at night. Sleeping through the night is important for both me and the baby! :).

Here are the reasons I cloth diaper.

1.) Less exposure to chemicals for my baby.  There are lots of nasty chemicals used to get those disposable diapers to absorb so much and not leak! I had no idea that diapers could contain polyurethane or harmful inks in the cute prints on them.  The less amount of time those chemicals are on my baby's bum, the better!


2.) Cost.  Now, this one is a tough sell unless you have restraint!  You can have an awesome stash of cloth diapers for less than $200.  This would maybe have you doing diaper laundry every 2 to 3 days.  We all know how much disposables can run a month.  Restraint comes in to this equation when you see all the beautiful and cute diapers that are out there.  Thinking that your baby needs the latest in the Artist Series of BumGenius Diapers or the Charlie Bananas Chocolate Camo Diaper, then the cost can get high.  But, if you have restraint, then the cost of cloth diapering is cheaper than using disposables.  Especially if you end up having more than one child.
You can also resell your cloth diapers. They maintain their value if they are taken care of.

3.) Environmental Impact.  I am trying to reduce my family's carbon footprint on this earth.  I do try and do all that we can with regard to this.  I am also trying to teach my boys to respect the planet.

4.) Cute, Cute, Cute!  Ok.  This is a good enough reason for me!  These diapers are so cute! I really love when all the diapers are washed and pockets are stuffed and all lined up in the crate I keep them in.  (Did I really just say that?)  Yes!  I did! I love the way the blues and greens all look lined up!

5.) Conversation Starter.  I really love how cloth diapering is such a conversation starter with people.  This ultimately leads to me talking about eating healthy and the things I do to help my family be all that we can be. I feel that if I can help someone with any questions then that makes me feel good.


How cute is that? 


Love this blog? 
Vote for us daily so we can continue to bring you great giveaways!

Visit Top Mommy Blogs To Vote For Me!


Advertisement

You've made the switch to cloth for your little one,
 now why not make the switch for yourself?

Thursday, April 25, 2013

Crock Pot Apple Cinnamon Oatmeal

Hi everyone! I thought I would share another super easy (and healthy!) recipe with you all! Now, I know that oatmeal is not a time consuming item to make. But, I will save ANY time I can in the morning. Upon waking, my baby, F., wants to be held by Mommy. ( I think he misses me at night :) ) My oldest son, M., just wants to eat in the morning! And he would like oatmeal. Every. Day. As I have mentioned, we try to avoid grains and refined sugars, so I have been looking for new tricks to entice him. I saw this recipe on Pinterest and decided to tweak it to fit for my family.
 Enjoy!

Crock Pot Apple Cinnamon Oatmeal

 First- butter the bottom of the crock pot. This oatmeal will stick to the pot and be a nasty mess! You can use coconut oil or butter.

 Slice up two apples and place them in the bottom of the crock pot.


Add 1/4 cup of brown sugar (I used coconut sugar),
1 tsp of cinnamon
pinch of salt
Pour 2 cups of oatmeal (gluten free if you have them!)
2 cups of milk (I used almond/coconut milk)
2 cups of water.

Do NOT stir the mixture.
Place on LOW for 8 to 9 hours.
In the morning, I added honey and cinnamon and a splash of coconut milk.
It was super delish! The family ate it up!

Hope you enjoy making this!


Love this blog? 
Vote for us daily so we can continue to bring you great giveaways!

Visit Top Mommy Blogs To Vote For Me!


Advertisement

You've made the switch to cloth for your little one,
 now why not make the switch for yourself?

Tuesday, April 23, 2013

Stranger Anxiety with New Moms

If you are pregnant with your first child or are a new mom (and by new mom, I mean "a mom with less than my whopping 13 months of mom experience"), I am about to let you in on a little secret: complete strangers know more about caring for your child than you do.


I have no idea what I'm doing.
It sounds weird, I know, but it's absolutely true. You're the woman who grew the child in her uterus from a microscopic little blob to a full grown baby whose presence caused your stomach to break out in purple stretch marks that faintly resembled a road map of the United States. Since you first saw two pink lines on a pregnancy test, you've likely spent every waking moment (and many sleeping ones) worrying that you weren't doing EXACTLY the right thing for your child and googling a million variations of "can I use hair spray while I'm pregnant?" And of course that worrying only intensified when your baby was brought, wrinkled and crying, into the world. Or perhaps you adopted your child, and before you ever even learned of her existence, you were spending hours researching the very best way to care for her every need so that you would be ready to be the best mommy humanly possible at a moment's notice. You are probably the only person in the world for whom a description of the color of your baby's eyes requires a minimum of three adjectives. You've spent literally hundreds of hours just staring at your baby (or you will once your baby is born), and just from the pitch and volume of your baby's cry, you can often tell exactly why he is crying in under 30 seconds. But none of that matters. Because complete strangers - people who have never so much as laid eyes on your child until right this second - are the ones who are the experts on what your baby needs.


How do I know? Because they will approach out of the blue you and tell you exactly what you should be doing for a baby that they may mistakenly think is a girl even if he is wearing a onesie that says "Mommy's little man." Or, even worse, they will loudly criticize your parenting within earshot.

Here's an example: Last September, I was taking a walk around our neighborhood with L in the ErgoBaby carrier. It was 64 degrees (I know this because I checked as soon as I got home.) In addition to being pressed up against my torso, L was wearing fleece pajamas, a sweatshirt, and a hat. I had been walking for about five minutes when I passed a 30-something man and a woman who were walking together in the opposite direction. As soon as we had passed each other, the woman said loudly, "It is WAY too cold to have a baby out here!" Imagine how grateful I was to have overheard her! See, up until that point, I thought that the fact that I can tell whether L is cold simply by listening to him breathe was a sufficient indication of whether or not I was mistreating my child by bringing him out into frigid mid-60's weather, but it turns out that the only one who is capable of determining if my son is warm enough is a woman I've only ever seen that one time who may or may not have children of her own. You'd be a fool to ignore that kind of expertise!

He's clearly freezing.
So here is my advice for new moms: Go to a crowded place. A grocery store or shopping mall will work fine. Then just stand there with your baby. It helps if your baby is only wearing one sock (or better yet, no socks at all.) Before you know it, helpful people will be swarming all over you to tell you what you're doing wrong.

Or you can save yourself the trouble of knowing how very little you know about your own child and remain in blissful ignorance by buying this onesie:

Bethany is a contributing guest blogger for Mommys Craft Obsession. To read more, visit her  blog, "I was promised more naps."


Love this blog? 
Vote for us daily so we can continue to bring you great giveaways!

Visit Top Mommy Blogs To Vote For Me!


Advertisement

You've made the switch to cloth for your little one,
 now why not make the switch for yourself?

Sunday, April 21, 2013

DIY Pop Cap Bracelets

I would like to start by first saying that I am so greatful to Alex of Mommy's Craft Obsession for this opportunity.  I have been thinking about starting my own blog for a few months now and then I saw Alex's post and knew that this was the little push that I needed.

My name is Sarah and I am a mommy to two super special kids. My daughter is 11 and my son is 22 months. Now that is a BIG gap (that is always what people say to me....it makes me laugh every time because you have NO idea!). I thought I was one and done and then we got a suprise and what a blessing he has been.  After my son was born in 2011 I quit my job in the banking world and became a stay at home mommy.  I love this new job and journey but I have a great perspective on both sides. It is hard to be a working mom, the struggles of missing things, guilt and work always being there needing more time. It is also hard being a stay at home mom. People think you do nothing as if taking care of kids, home and everyone elses needs it not a FULL time job. So I totally get it! But I would not trade this great time with my kids for anything.  Then there is my husband we have been together for 10 plus years he is my best friend and the person who gets me better than anyone, he makes me laugh when I shouldn't and brings great joy to my life. I wouldn't want to tackle this crazy world with anyone else! Check out my awesome family below this is four generations of love! So now to the good stuff, my blog is new and hopefully will grow with each new friend we make.  It is called Faith Filled Footsteps because that is what I do every day.  I step out into this crazy world with Faith the God knows what he is doing and that what we have is provided by him. He places things in our paths for our growth in him. I raise my children to believe that he is our all and the only thing that we need. So please join us in this crazy journey as we take every day with Faith Filled Footsteps.

DIY Pop Cap Bracelets 

We just finished up spring break here and I don't know about you but all I hear from my daughter during school breaks is " I AM BORED!". So we try and find something to do a few days during breaks.  This time we tackled a super fun project a pop cap bracelet.  My daughter saw these on Etsy and they were $8.00-$13.00. Now I don't know about you but my budget does not allow for kids jewelry in this price range. So we set out to make one. We tried a few that ended up terrible but here is the one we ended up making and my daughter loved.  In fact my 23 year old sister wanted one too!


What you will need:

Ribbon of your choice (thinner is better)
18-26 pop caps
tape 
scissors

To start off take the ribbon and wrap it around your wrist 4 times this is to allow for the proper length.  Fold the ribbon in half to find the middle. Once you have the center take a few pieces of tape  and tape in to your working surface tightly (you will be pulling on this so tape it down good, I used 3 or 4 pieces).


You can do this 2 ways you can face all the pop caps the same direction (this is what we did to eliminate any confusion) or you can alternate them to make the bracelet a little wider.

Take your first pop cap and lace the ribbon up from the bottom through the 1st cap. Pull this cap tight to your tape. You don't want the loop to be to large at the top because this is how you tie the bracelet on.


Take your second pop cap and lace the ribbons down through the holes. Your ribbons will go straight they never criss cross (thought you could probably do this for a more decorative look if you wanted but after so many tries I wasn't going to make this any harder!). Then lace the ribbon back down trough the first cap. Remember to keep the first cap thight to the tape as you tighten them down!


Take your third cap and lace the ribbon up through the holes don't pull it tight to the second cap because you need to lace the ribbon up through the second cap then pull tight.


The first and third cap should be making a row on the bottom with cap two making a row on the top. The side should look like one cap stacked on two caps.

Now take cap four and lace the ribbon down through the holes don't pull tight because you then need to lace the ribbon down through the cap underneath it cap 3.


Continue these steps until you have the desired length for my daughter it was 18 caps for my sister 21 caps. Then tie a double knot underneath the last cap and lace up to make your end ties.  Tie the braclet around your wrsit like a friendship bracelet making a bow then you can cut any extra ribbon. You can also make a belt but that takes about 65 pop cans! 


We loved the way these look.  Just a side note we found 1 yard spools of great pattern ribbon at Jo Anns Fabric for $1.00 so these bracelts were CHEAP! And the yard of ribbon was the perfect length. You can also use colored pop caps some different sodas have different colors or you can spray paint them. These are the three we made!


I hope you love this craft enough to checkout my blog and Facebook page. I can't wait to bring you another guest blog next time.  Remember to make everyday a day of Faith Filled Footsteps.


Visit Top Mommy Blogs To Vote For Me!


Advertisement


You've made the switch to cloth for your little one,
 now why not make the switch for yourself?