Pages

Sunday, June 30, 2013

Event Announcement - She Said YES!

We are ENGAGED!!


And guess what!  So is We're Parents!?! We've decided to team up together to bring you one FABULOUS event! "SHE SAID YES- A Virtual Bridal Shower" will begin in September. We are working to team up with some incredible sponsors to bring you the best reviews & giveaways for products that you NEED to make sure is on your own registry or that you should be getting for your favorite friends or family for their bridal shower or wedding.


Bloggers- This is an exclusive, invite only event. However, if you feel like your blog deserves to be a part of this event, please contact me at mommyscraftobsession@gmail.com for specific eligibility requirements. 

Are you a company or PR firm that would 
like your product(s) featured in this MEGA event that will reach over 100,000 consumers?? 

Contact us ASAP to reserve your place
Spots are limited.


E-mail: mommyscraftobsession@gmail.com


Top Mommy Blogs - Mom Blog Directory

DIY Forth of July Wreath

Hello Everybody (it's Rebecca)!! Hope everyone is doing well and enjoying the summer heat. It went from the 60's to 90's in the matter of a week where I live. Its been HOT! But, I have a great easy craft for you all today. I was able to take advantage of the warmer weather and do most of this project outside. I enjoyed being out and the paint also dried a lot quicker. Win-win! This is the awesome wreath that we will be making.


What you will need:

Clothespins- about 80-100  (there will be extra, but some clothespins were not pretty straight out of the package so I didn't use them for this)

red, white and blue paints.  I used acrylic paints.

10" embroidery hoop

star stickers


To get started:  You need to paint the clothespins.  I painted about 18 of them blue, then 25 red and 25 white.  I painted the whole pin which got a little bit messy.  You really do not need to paint the backs of them.  Just make sure to definitely give the front a second coat to make it look really good since that is what will be seen. 
(My 5 year old painted one clothespin before he tired of it and ran off to play.  Perhaps you will have better luck getting your kids involved!)

After the clothespins have been painted, place the blue ones on the embroidery hoop as close together as possible.  (note: Only use the inner part of the hoop. not the part with the clasp-y thing on it)
This is where the amount of blue is subjective, add more or less as you like. Then add the red and white alternating as you wish.  Just remember to keep the blue on the upper left to resemble the flag.


Then add star stickers to the blue and VOILA!  You are done!!  Now hang this on your wall, door or wherever you wish and show your pride!

Thank you all for reading!  Happy Crafting!


Love this blog? 
Vote for us daily so we can continue to bring you great giveaways!

Visit Top Mommy Blogs To Vote For Me!


Saturday, June 29, 2013

Baked Shells Recipe


I absolutely love going to nice restaurants, particularly Italian restaurants. Order a nice glass of wine, eat some delicious pasta, go home one happy lady. The problem with going out to nice restaurants is that typically the portions are small and the prices are high. One of my favorite meals to eat at a nice Italian restaurant are Stuffed Shells. Not only are they amazingly tasty, but they're pretty filling as well! Fed up with the high restaurant prices I decided to go on a search for a recipe that I would love, and voila! I found it. 


What I loved about the original recipe is that not only was it easy, but it gave me the recipe to make my own sauce for it as well. Of course I had to change a couple things to make what I had in the pantry work with the recipe, but I was ecstatic to have found such a gem. I knew i had to share it with my lovely readers. 


What You Need:

1 Box of Jumbo Shells

What You Need To Do:

Cook as directed on the back of the pasta box, I cooked until al dente.


What You Need:

1/3 Cup Olive Oil
1 1/2 Teaspoons of Crushed Red Pepper Flakes
3/4 Teaspoon of Salt
4 Garlic Cloves, Finely Chopped
1 Can (28 OZ) Crushed Tomatos
1 Can (14 OZ) Diced Tomatos

What You Need To Do:

On your stove top, combine the olive oil, garlic, red pepper flakes, and salt. Stir over medium-high heat until your ingredients start to warm up (about 45 seconds-1 minute).


Next, stir in the crushed tomatoes and the diced tomatoes and heat to a gentle simmer (approximately 2-4 minutes). Remove from heat and do a taste test to see if the sauce needs more salt (this will be to your preference).


Pour approximately half of the sauce into the bottom of a 9X13 baking pan, leaving the remainder of the sauce in the pot and set both aside for later.


What You Need:

1 (15 OZ) Container of Ricotta Cheese (I used reduced fat)
1 Cup of Grated Mozzarella
1 Egg, beaten
1/4 teaspoon of salt
4-5 Chopped Green Onions (Original recipe called for Chives but I didn't have them on hand)

What You Need To Do: 

Start by beating your egg in a medium sized bowl. Next, add the ricotta cheese and the mozzarella cheese and stir until combined. Add in your salt and about 3/4 of your green onions (or chives) and stir until thoroughly combined.


Prior to assembling your shells, preheat your oven to 350*. Here's where the recipe can get a little messy! Using a spoon (or if you have something easier, by all means, use it!) add a spoonful to a spoonful and a half of the ricotta mixture in each shell. I fit approximately 20 shells in my 9X13 pan, and I ended up taking out another small pan to cook the remaining shells. 


Once your shells are stuffed, top with your remaining sauce, green onions, and as much mozzarella cheese as you fancy! 


Cover your baking pan with foil and bake for 30 minutes. Remove foil and bake for an additional 15 minutes or until they are cooked thoroughly.


Doesn't it look scrumptious?!

Remove from your oven and let cool for just a few minutes so you won't burn your mouth before gorging into this lovely meal. 


YUM!


Love this blog? 
Vote for us daily so we can continue to bring you great giveaways!

Visit Top Mommy Blogs To Vote For Me!


Friday, June 28, 2013

5 Simple Steps to Organize an Average Sized Closet

*You are about to read a sponsored post written by Mommys Craft Obsession. All thoughts and opinions are my own.*

A dream of mine is to one day own a home that has a gorgeous walk in closet. A fantasize about a closet like the one in Clueless or in The Devil Wears Prada but unless we hit the lottery that dream will most likely never become a reality. I'm not trying to be a "Debby Downer", I'm just being realistic! Those closets are the size of houses! Majority of us own homes that have "average sized" closets, which means that we need to do our best to organize according to our space. Whether you take matters into your own hands and just "wing it", or are considering custom closet design, there are simple ways that you can improve your closet space and keep it organized. 

Below is a photo of both sides of my closet, just yesterday! A total mess, clothes shoved everywhere, no organization to speak of. I couldn't wait to get started on my journey with organizing and to utilize the five simple steps that I am about to share with you today. 


Step One
Start by going through each thing in your closet and determining if it deserves to stay in your closet, be thrown in the garbage, or be donated to charity. If you haven't worn it in the last 6 months, it doesn't deserve to stay in your closet. If it's not going back in your closet and isn't full of holes and stains, it should be donated to charity! 

Step Two
Once you've decide which clothing to get rid of, you'll want to put your "keepers" back into the closet. I personally like to organize my closet by style and color. From left to right here is how my closet is organized..
Jeans, Skirts, Shorts, Basic Tanks, Tanks/Summer Shirts (organized by color), Tees/Blouses/Long Sleeves (organized by color), Sweaters, Jackets, Hoodies, Dresses. 

Step Three
Plastic Drawers your best friend. Grab some organizational plastic drawers drawers to organize your delicates, pajama's, socks, or whatever else you'd like to keep safely in a drawer rather than on a hanger. I have two organizational plastic drawers in my closet, one holds my crafting supplies and the other holds the clothing just mentioned. 

Step Four
Keep your closets shelving unit clean. The more stuff you pile onto the shelving unit, the less organized it will stay. Keep your necessities up on the shelve and thats it. For example, my shelf holds a plastic box with my handbags, my OPI train case for my nail polish, an extra small plastic box for a few odds and ends that don't really have a secure place in my closet, and one more plastic box that holds my bathing suits!

Step Five
Organize your shoes. This last step is so important but many may not realize it. If you keep your shoes in a giant pile at the bottom of your closet (like mine were), it's going to give your closet a messy feeling even if everything else is organized. If you do not have the means to purchase a small shoe rack, hang onto a few shoe boxes to keep your nicer shoes in, and stack the remaining shoes on the boxes. In my closet I have three shoe boxes that contain my nicer shoes, and my other shoes (such as my Toms, sandals, flats, etc), are stacked neatly on top. 


With those five easy steps I was able to organize my closet and it felt SO amazing once it was done. Although you may not be able to tell from the photos, it really did make a world of difference in my closet! 

One day I look forward to a slightly bigger closet and being able to call in experts for advice and help with closet design, giving me the chance to make my own gorgeous custom closet. In fact, when we purchase a house I'd love to call in experts to help create my own custom everything! Interior decorating isn't particularly my strong suit so if I can get help with everything from closet design, kitchen makeovers, and home office design, I'll be taking advantage!! Until then I will continue to use my five simple steps to organize an average sized closet and I recommend that you do too!

*Mommys Craft Obsession has been compensated by California Closets for the publication and promotion of this guest post. As always, all thoughts and opinions are my own.*


Love this blog? 
Vote for us daily so we can continue to bring you great giveaways!

Visit Top Mommy Blogs To Vote For Me!


Gymboree Review & Giveaway

As a parent, there are three things that you look for in your child's clothing; stylish, affordable, and quality. Sometimes it can be a challenge to find all three wrapped up into one little outfit but thankfully Gymboree offers all three qualities in their clothing!

Photo Credits: Gymboree

*I received a complimentary gift card to facilitate this review in exchange for my honest thoughts and opinions*

Gymboree has been dressing children stylishly since since 1986 in high quality, unique clothing and accessories. Available in sizes newborn to 12 years old, Gymboree is designed with bright colorful, quality fabrics, with detailed touches throughout. Gymboree currently operates in over 630 stores in the US and Canada, and of course through their website. 

Gymboree generously offered me a $75 gift certificate to go shopping with in one of their Gymboree retail stores! I was so excited for the opportunity that I went shopping as soon as I could once the gift card arrived. I live approximately 45 minutes away from our nearest shopping mall, so I planned my day accordingly and hit the road on my journey to Gymboree. When I arrived at our mall I noticed that our Gymboree had gotten a remodel since I had last visited the mall, and it looked wonderful! The store was crisp and very inviting!


When I walked into the store the first thing that I noticed was the sale table! I always love a good sale, so to see some ridiculously adorable clothing on sale was enough to make me giddy! What I particularly loved was that the first table you saw when you walked into the store was full of clothes for little boys. So often you walk into a children's store and the first few displays are for girls and you have to walk further into the back to get to the little boy clothes! It was refreshing to see the boy clothes in the front (and on sale!).

Immediately after walking into Gymboree, I was respectfully greeted by the friendly staff, and they even greeted Baby A as well! I was told that if I needed any assistance to simply ask for it. I spent about an hour going through the clothes, combining different pieces to make cute outfits, and finalizing the details of my purchase. 


With the $75 gift certificate that Gymboree issued me I was able to purchase nine (9) different clothing items including five (5) shirts and four (4) pairs of shorts. Baby A has been growing quickly so I decided to buy a size up from his current clothes and grab 2T in everything, with exception of the red shirt and blue shorts (shown below), which I purchased in a 3T. I absolutely LOVED the current clothes that Gymboree had in stock and it was so hard to make a decision on what to purchase. 


The doggy & ball shirt and light blue shorts (seen below) are absolutely perfect for the summertime because they are comfy and cool for your little one to hang out in. That outfit was purchased in a size 2T so that it would fit Baby A this summer but he wouldn't grow out of them to quickly and we could hopefully get some use for them even after summer is over. The other doggy shirt and dark blue shorts were purchase in a 3T because I loved the outfit but the shirt wasn't available in a 2T! Here in Arizona the weather is always relatively hot so even though it will take Baby A time to grow into this outfit, he should have no problem fitting in it for next spring.


The crab shirt and orange shorts were a personal favorite that I knew Baby A would look SO cute in! I have a soft spot for sea creatures on clothing that outfit for me was a 'must purchase'. The last three items that I purchased were two a pair of shorts and two shirts that would look perfect with the shorts. The hammerhead shark tee and the "daddy's best buddy" shirts were SO adorable there was no way that I could resist! I honestly loved everything about them, the color scheme, the fish/shark. so cute for my little man! 


On Father's Day I put the "daddy's best buddy" outfit on Baby A and he looked so handsome. Mr. Hunky had a big smile on his face when he saw the shirt and I could tell that Baby A was very comfortable in his new clothes! 


The quality of the clothing at Gymboree is fantastic, it holds up in the wash, the color doesn't bleed onto other clothes, and even after a ton of washes there are none of those pesky little holes that most clothes get! The sizing is roomy so even if you purchase your child's exact size they will still have room to grow. Gymboree is not only stylish and high quality, but affordable too!

Plaid Shorts are now on sale for $12.99

Total Spent: $72.97 (before tax)


Are you ready to go shopping!?


To Purchase: Check out Gymboree's current line of clothes for your little guy or gal and go shopping at Gymboree's Website! Or visit them at your closest Gymboree Store!

To Win: Gymboree and Mommys Craft Obsession want to give one lucky winner a $75 Gymboree Gift Card!! Enter the Giveaway Tools form below for your chance to win!

Entry-Form

Congrats to Tiffany Klimarchuk!

The Giveaway will close late on the evening of July 12. The winner will be chosen at random through Rafflecopter which uses Random.org. The winner will be announced both on Rafflecopter as well as MCO’s Facebook. The winner will have their prize sent to them by Gymboree, Mommys Craft Obsession is not responsible for prize shipment. Must be 18 years and older. Facebook, Twitter, Pinterest, and Google are in no way affiliated with this giveaway. No Purchase Necessary. US Only.

*This review is 100% original and in my own words. Everything written is from my own personal view point and opinions, what works for me, may not work for you. All photos have been taken by me unless stated otherwise. I have been provided with product to review by Gymboree however I have not been compensated monetarily for this review.


Love this blog? 
Vote for us daily so we can continue to bring you great giveaways!

Visit Top Mommy Blogs To Vote For Me!


Thursday, June 27, 2013

10 Kid Friendly Activities for Summer 2013


Finding activities to keep your kids busy during the summer can be a task that will leave you pulling out your hair. As a parent, some days you just feel like staying in your comfortable clothes at home and other days you feel like getting out of the house and having a fun day out on the town! Below are 10 activities that will keep you and your kiddo(s) busy throughout the summertime!


1. Hit The Zoo

There's no better way to educate on animals and their sounds than by visiting the zoo! Whether you're just wanting to walk around for some fun and fresh air, or whether you're going there to brush up on your animal sounds, you and your child will have a fun day checking out the gorgeous animals and the scenery! 

2. Visit a Children's Museum

Children's museums are not only fun, but educational, and air conditioned as well! Give your little one the chance to run around and learn hands on at the same time. Spend the day by taking your time through the various exhibits, having a nice lunch at the museums restaurant (if they have one), and teaching your child as much as possible while you're there!

3. Have an Outside Paint Fight
Photo Credits: Get Your Mess On

Use this recipe to make homemade paints, put down a sheet in your back yard, and let the paint fly! Everyone will have tons of fun, get messy, and then be able to hose down when the fun is over! You're child(ren) will love the spontaneity and the mess, and you'll love that it's outside!

4. Sidewalk Chalk Photo Opps
Photo Credits: CarrieAnneMiranda

Pull your car(s) out onto the street and whip out the sidewalk chalk, it's time to draw a fantastic scene on the driveway, have your kids lay in the scene, and take some pictures! You're little ones will love drawing their pictures and then make their drawings come to life! Not to mention that the photos make great keepsakes or possible holiday cards! 

5. Treat Your Child to Mommy and Me Swimming

Swimming seems to be a regular occurrence for most families in the summer, but it's often filled with family and friends, which is fantastic, but can get to the point where it seems a little....familiar. Make it special for your child and take them to the pool, just you and them, and spend some special time swimming together. If you have multiple kids, hire a babysitter or have your spouse stay with them and take one at a time to the pool and spend a special 30 minutes with each of them! 

6. Have a Picnic in the Park

Eating lunch at home or in restaurants can get old fast so why not make things exciting by throwing lunch in a basket and heading to the park? Pick a shady tree, lay out an oversized blanket, kick off your shoes, and enjoy your lunch in the fresh air. 

7. Go to a Matinee Movie

Sometimes there's nothing better on a hot day than to escape to somewhere dark and cool, and what better place to escape to than a movie theater! Treat yourself and your little one(s) to a matinee and some popcorn! 

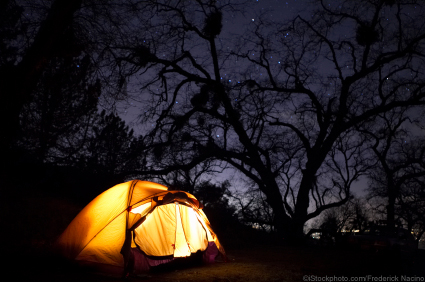
8. Camp in the Backyard

Summer nights are amazing and so relaxing. I have memories of camping in the front yard with my parents when I was little and it's a tradition that I would love to pass down to Baby A when he's older. Your son or daughter will love helping you pitch the tent, laying out the sleeping bags, and playing with the flash lights when it's dark! 

9. Turn Your Living Room into a Fort

Grab all those blankets, sheets, and towels and create a giant fort in your living room! The couch, entertainment center, ottoman, bookshelf, and whatever else you have in your living room will make it easy for you to literally turn the entire room into one big flowy fort. Crawl in and out, throw all of the pillows inside, and read books! Bring in a snack and tell a silly story, or even pull out the portable DVD player and snuggle up with your little one!

10. Have a Pajama Day

On the days that you just don't feel like getting dressed...don't! Have a pajama day, snuggle up in bed, watch a few dozen movies, eat junk food, and just relax! It's hot outside so treat yourself to a lazy day with your little one! 


Love this blog? 
Vote for us daily so we can continue to bring you great giveaways!

Visit Top Mommy Blogs To Vote For Me!