Pages

Showing posts with label Mickey Mouse. Show all posts

Monday, October 1, 2012

DIY Mickey Mouse Foods

First let me start and apologize, this post will be a how to on party foods that look like Mickey Mouse, however, in the chaos of all of the party planning and prepping, I completely spaced on step by step photos, but I am hoping that by my instructions you will be able to picture it in your head and easily make what I will be sharing!

  Mickey Mouse Cupcakes:


For the cupcakes, I cheated and bought cake mix from the grocery store. I used both vanilla and chocolate to give party guests a choice of cake they would enjoy. For the frosting I made my special Oreo Buttercream and for the ears I used whole Oreos.

1. Bake your cupcakes and let them cool completely

2. Prepare the buttercream by using THIS recipe.

3. Take your oreos and gently break them apart, scrape the filling out so that you are just left with the cookie.

4. Stick the cookies into the sides of the frosting so that they make Mickey Ears!!


Mickey Oreo Pops:


The most important part of making these Oreo Pops is that you buy Double Stuffed Oreos! This will not work with regular oreos! I learned the hard way and my stepdad had to run out at midnight to go get me double stuffed! Best step dad ever right? You will also need to purchase Chocolate Candy Melts, you can find these at the party store or even large craft stores such as Michaels. You also need large lollipop sticks, white chocolate chips and red food coloring.

1. Take your candy melts and melt the end of them (I used a lighter) and stick into the filling of the Oreo, one on each side, to create Mickey's ears. Repeat this process for all of the Oreos until you reach your desired amount of pops. Lay flat on tin foil for the chocolate to form to the filling.

2. Melt your white chocolate in a saucepan over low heat and add drops of red food coloring until you reach the desired shade of red.

3. Take your Mickey Oreo and dip it halfway into the red chocolate.

4. Quickly take your lollipop stick and stick it into the Oreo going through the chocolate and into
 the filling.

5. Lay flat on tin foil and let cool and harden. I stuck mine in the refrigerator overnight. (Parchment paper may work better but I didn't have any)

6. When you're ready to get them off of the tin foil, heat up a butter knife (I stuck mine over the burner) and slowly slide under the white chocolate to detach them.

7. Stick them out for display!!

Mickey Oreos:


You can use regular oreo's or double stuffed if you have some left over from your Mickey pops! You will also need candy melts for this project.

1. Take your candy melts and melt the end of them (I used a lighter) and stick into the filling of the Oreo, one on each side, to create Mickey's ears. Repeat this process for all of the Oreos until you reach your desired amount of pops. Lay flat on tin foil for the chocolate to form to the filling.

2. Stick them out for eating!

Other Yummy Party Foods:


For the party tray I also made a fruit salad, i purchased a veggie try, I put out chips & french onion dip, cut up colby jack cheese and rolled salami onto tooth picks, and made a Funfetti cake batter dip with vanilla wafers and pretzels!

For the Funfetti Cake Batter Dip:

1 Box of Pillsbury Funfetti Cake Mix
1/2 Large Container of Vanilla Yogurt
1/2 Container of Cool Whip


I hope you are able to use some of these ideas for your own party! They were all tons of fun to make!



Friday, September 28, 2012

DIY Mickey Mouse Decorations

Hey there Folks! Mickey Mouse here! Okay, not really, but it is MCO! Earlier today I gave you a preview of everything that I did for Baby A's Mickey Mouse Birthday and as admired earlier, it was a ton of work. But it was also a lot of fun and I would recommend making your decorations over buying. It may be more time consuming but it is such a great feeling to know that you worked our butt off for your baby!

The Basics:

1. Purchase card stock in red, black, and yellow. You will be using a LOT of card stock for these projects.

2. Download a Disney font onto your computer. I used Waltograph from Dafont, but be careful because a lot of the font websites carry viruses. I have used Dafont before and I know people that use it frequently and so far no problems. However, use at our own risk.

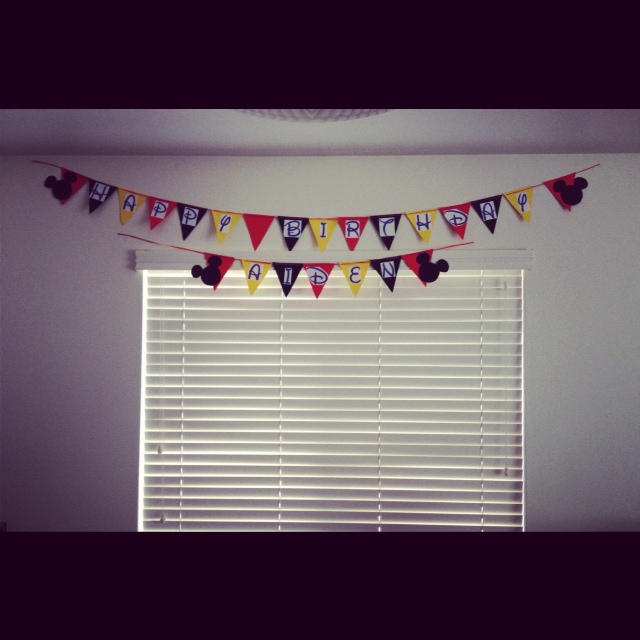
3. Use your word processor and type up whatever Mickey catch phrases you would like to see around your home. I used "Meeska, Mouska, Mickey Mouse", "Oh Toodles", and "We've got ears! Say Cheers!". For the banner I used "Happy Birthday Aiden" and I also made a sign for my door so I typed up "Welcome to the Party Folks" to make people feel welcome and excited to enter Baby A's Mickey Mouse party!

4. Print your phrases and set aside for later use.

The Shapes:

1. Refer to my DIY Mickey Mouse Invitations posting for instructions on how to create the Mickey shapes. Once you have your template, cut the desired amount of Mickeys out of your black Card stock.

2. Using a ruler create a triangle shape out of printer paper as a template for your banners' flags and your Mickey head backgrounds.

The Banner:

1. Count up how many letters will be on your banner and add an additional five. This will be how many flags (triangles) you will need. For example, "Happy Birthday Aiden" is 18 letters, you will want one flag for Mickey prior to the H in happy and after the Y in birthday, plus a space between Happy and Birthday. For the second banner (the name) you will want one flag for Mickey on either side of their name.

2. Alternate the cutting flags between red, black, and yellow card stock.

3. Cut out the letters for the phrase you will be using on the banner, getting as close to or cutting the letter out completely as possible.

4. Lay your flags out on the floor (I used my living room since it had the most space) alternating the colors of the flags.

5. Using a ballpoint pen, poke holes in the top corners of the flags so that you can string ribbon through them. I say use a pen rather than a hole punch because the hole is smaller and the flags won't move around.

6. Using ribbon (I used curling ribbon, you can use regular ribbon, string, or yarn) string it through the holes until all of the flags are being held together.

7. Use glue to adhere the letters and the Mickeys to the flags!

8. Hang on the wall for the party!


The Decorations:

1. Cut the phrases either as close to the word as you could like or by cutting the letters out.

2. Attach Mickey heads to triangles in colors of your choice

3. Using scotch tape, attach the phrases and the Mickey shapes to the wall in desired places.


The Door Sign:

1. Cut your door phrase into a perfect square.

2. Using a full page of card stock (in your desired color) attach the phrase onto the card stock using a glue that drys clear.

3. Attach your Mickey.

4. Hang on the door and enjoy!


I hope all of these DIY's made sense!! Feel free to ask any questions that you may have in the comments below and I will answer them as quickly as possible. Stay tuned for DIY Party Foods this weekend!